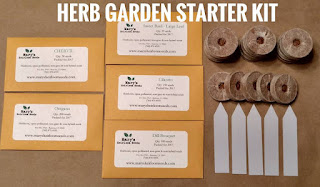
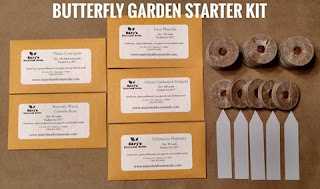
This is a great starter kit for your Kitchen Herb Garden. Includes a full-pack of the following varieties: Genovese Basil, Cilantro, Dill, Oregano, Sage, Tarragon, Thyme
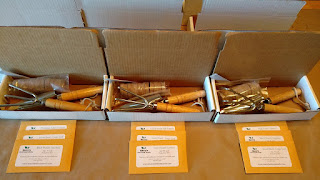
STARTER PACK option includes 24 coconut coir pellets, 7 plant markers and Garden Tools set
We're raising chickens here at Mary's Heirloom Seeds and growing extras for our birds. Supplementing fresh, homegrown veggies and grains for our chickens is not only super healthy but it can also save a bunch on your feed bill!
This Combo pack includes:
2 ounces of Reid's Yellow Corn - Perfect for cracked or whole corn. An excellent storage corn that produces loads of high protein kernels. The staple of any scratch recipe.
2 ounces of German Golden Millet - Easily cut and hung up in the garage for later use. We tie these sprays of millet together, hang in the barn and throw the entire spray to the the chickens when we need it. No need to thresh, and the chickens love it.
2 packs of Fordhook Giant Swiss Chard - huge chard perfect for poultry greens, which are absolutely vital to good growth, egg production, chick development and health.
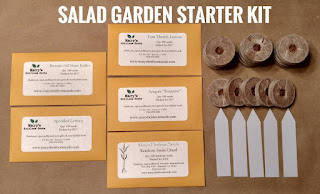
Includes SEEDS from Mary's Garden Pack. Over the years I've tried new varieties in my garden. This seed combo pack includes many of my favorites! Includes One packet of each: -Amana's Orange Tomato-German Giant Radish -Anaheim Pepper -Detroit Dark Red Beet -Jalapeno Pepper -Tom Thumb Lettuce -Blue Lake Bush Bean -Purple-Top Whiteglobe Turnip -5-Color Silverbeet Swiss Chard -National Pickling Cucumber
All of the seeds listed are open-pollinated, non-gmo & non-hybrid, non-patented, untreated, heirloom garden seeds. Mary has signed the Safe Seed pledge.
All over the radio and around I'm seeing advertising for Black Friday sales and a few of my friends have asked if we're having one as well. Well, the answer is NO...and YES!
This year, we're spending time with our families and not stuck behind a computer. Thursday we'll all get together at my sister's house and Friday I'm spending the day with my Dad, behind the counter at his retail shop.
We're starting a Sale TODAY that will run thru Sunday, November 27th
*While Supplies last*
Before we get to the Seed Sale, just a quick reminder. Our Gardens Fundraiser is going thru Dec 19th. We've added more items. Check back often for more NEW Items and Thank You for helping us help others!
SEEDS, COMBO PACKS & STARTER KITS
SALE Ends November 27th
*Click the Images for complete details*
We've added Organic Plant Food samplers to 3 of our Combo Packs/Starter Kits AND they're On Sale!
The 6 Month SUPER Membership includes 8 seeds packs the first month and 2 seed packs each month for a total of 6 months. *Plus 4 packs of Organic Wildflowers*
We're on a roll here with planting season in full swing in warmer climates across the country! Many of you have asked about growing different varieties from seed so we'll continue to share
We've shared about Using Coconut Coir in the Garden here in several articles but we've had quite a bit of questions. Today we're going a bit more in-depth.
First, Why do we use Coconut Coir instead of Peat?
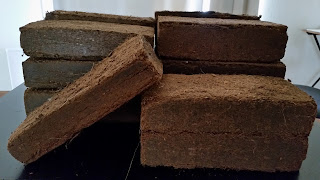
Coconut coir growing medium comes from the coconut's fibrous husk (known as coir) that is bound together by lignin (known as pith). After the husk is immersed in water for 6 weeks, the fiber is extracted mechanically, and the pith is left behind as a waste product and stored in heaps to age. Since the pith comes from the fruit, it is quite naturally rich in nutrients. Coconut coir growing mediums are dehydrated and compressed into a compact form for easy handling. With the addition of water, coir expands to an easy to work with growing medium.
Unlike peat moss, which is highly acidic, coconut coir has a neutral pH level. Most garden vegetables and flowers grow best in neutral to slightly alkaline conditions. When you use peat to amend a garden bed, an addition of agricultural lime is often necessary to combat the higher acidity. With coconut coir, limestone isn't necessary unless the soil naturally has a higher pH level. Coir use results in both a monetary and a labor savings, since you don't need to purchase further pH amendments nor work them into the soil.
-Coir improves soil drainage in the bed while also helping to retain moisture in quick-draining soils. Since coir breaks down slowly, much like peat, it creates air pockets in the soil that allow excess moisture to drain away from plant roots. The coir itself holds onto some moisture so the drainage doesn't occur too quickly and the soil doesn't dry out completely. These dual drainage and retention properties allow coir to improve moisture management in both heavy clay soils and dry, sandy beds.
-Peat moss, which coir replaces as a soil amendment, takes centuries to regrow once harvested. Coir is completely sustainable since it is a natural byproduct of coconut harvests, and coconut trees produce new coconuts every year. Using the coir in the garden keeps it out of the landfill where it would otherwise go. Coir can take a century or longer to fully break down in these landfills, so it's more sustainable to use it to improve your garden soil.
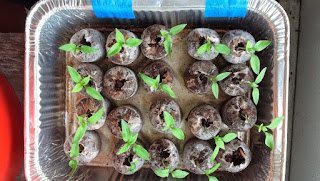
Step 1: Take out your Coconut Coir Pellets. I like to use a large tray
Step 2: Add water to tray and Coconut Coir Pellets. Using warm water might help them "grow" faster.
Step 3: Add seeds to the hole and gently cover or "squish" coconut coir.
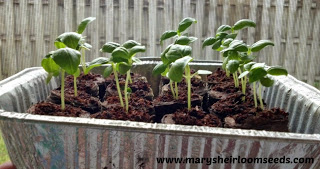
Step 4: Place in a warm sunny place and keep moist. This is where the real growing happens!
Common Seed-Starting Issues
GERMINATION
-Incorrect Temperature. Different seeds have different needs.
-Old Seeds. When properly stored seeds can have a very long shelf life. But the older they get, your germination rate will begin to reduce
-Incorrect Watering. Water in a necessity for all plants. In the germination stage you need to make sure you keep the soil evenly moist. If you water too much, you run the risk of your seeds rotting before they germinate. If you let them dry out, they will either never germinate or die trying!
-Planting Depth/Light. When you plant your seeds pay attention to your planting depth. This is important because if planted too deep you plants could run out of energy before reaching sunlight. Planting too shallow can lead to drying out. Some seeds actually need some light to germinate, so instead of digging them down you just press them into your soil.
MOLD or ROTTING
Dampening off, is probably the most common disease when starting seeds. It’s a fungus that can attack the seeds as soon as they germinate or after the seedling has emerged. You will know this is what killed your seedlings when you notice dark spots on the stem right at the soil level and the seedling topples over and withers away.
-Don't over water
-Provide air movement.A small fan will work
-Nutrients: Use a half-strength, organic fertilizer with tiny seedling.Our DIY Kelp Meal Tea is a great option for tiny seedling.You can use this as a foliar feed as well.
OVERCROWDING
For coconut coir pellets, plant no more than 2 seeds per pellet for small seeds and only one per pellet for larger seeds.If both seeds germinate, do not pull one out.Pinch off one of the seedlings at the base to remove.This will give the remaining seedling a chance to survive and thrive.
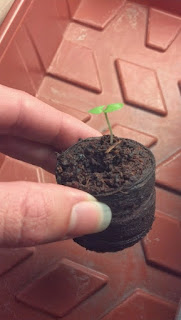
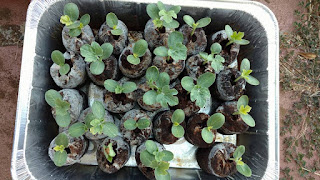
Once your seedlings are strong and roots start to grow out of the mesh, it's time to transplant them into the garden or into your containers.
Take the entire pellet and plant into the garden. For healthier root growth and to give plants a boost, I add a tablespoon of Azomite into each hole and mix into the dirt before transplanting the coconut coir pellet with growing seedling. I also water with a diluted version of our DIY Kelp Meal Tea when I transplant to help with shock.
We hope you have enjoyed our in-depth article about Seed Starting with Coconut Coir. If you have additional questions, feel free to comment below or send an email to mary@marysheirloomseeds.com
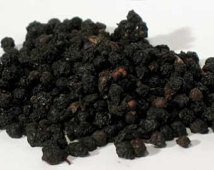
We make quite a few organic herbal remedies here including tinctures, salves and herbal syrups. Today we made more Organic Elderberry Syrup using organic dry elderberry. *One of the benefits of making syrup is that it's ready to consume in a few minutes to an hour compared to making tincture which can take 3 to 8 weeks to "brew."
"Health benefits of the elder plant include naturally improving colds, the flu, sinus issues, nerve pain, inflammation, chronic fatigue, allergies, constipation and even cancer. (2) When used within the first 48 hours of onset of symptoms, the extract has actually been found to reduce the duration of the flu with symptoms being relieved on an average of four days earlier. (3) During the 1995 Panama flu epidemic, the government actually employed the use of the elderberry to fight the flu.
It gets better. When it comes antioxidant power, elderberry is higher in flavonoids than blueberries, cranberries, goji berries and blackberries. (4) I’m sure you’re getting the picture that this medicinal berry is a real powerhouse for good health. Let’s examine exactly why."
Dr. Axe lists the many benefits of Elderberry including
1. Major Cold and Flu relief
2. Sinus Infection Aid
3. Lower Blood Sugar
4.Natural Diuretic
5. Natural Laxative
6. Encourage Healthy Skin
7. Ease Allergies
8. May Prevent Cancer
Elderberry syrup can be used to flavor other homemade concoctions, as an herbal tonic or even drizzled over toast or yogurt.
Make Your Own Organic Elderberry Syrup for Flu Prevention
Pour water into medium saucepan and add elderberries, ginger, cinnamon and cloves (do not add honey!)
Bring to a boil and then cover and reduce to a simmer for about 45 minutes to an hour. At that point, remove from heat and let cool enough to be handled. Mash the berries carefully using a spoon or other flat utensil. Pour through a strainer into a glass jar or bowl.
Discard the elderberries (or compost them!) and let the liquid cool to lukewarm. When it is no longer hot, add 1 cup of honey and stir well.
When honey is well mixed into the elderberry mixture, pour the syrup into a pint sized mason jar or 16 ounce glass bottle of some kind.
That's it! You just made homemade elderberry syrup! Store in the fridge and take daily for its immune boosting properties.
Standard dose is ½ tsp to 1 tsp for kids and ½ Tbsp to 1 Tbsp for adults. If the flu does strike, take the normal dose every 2-3 hours instead of once a day until symptoms disappear.
I hope you have enjoyed another educational article from Mary's Heirloom Seeds!
We offer so many amazing Seed Combo Packs and Starter Kits at Mary's Heirloom Seeds. However, we recently asked on our fb page what our customers would like to see in a combo pack. Several stated that smaller combo packs and starter kits would be appreciated... So we added MORE! Check out these NEW Kits!!!
For those of you just getting started and looking for guidance, we have created a special "kit" just for you. This starter pack includes PRINTED instructions from some of our more popular articles and tutorials as well as seeds, germination supplies, organic pest control and organic soil amendments Includes SEEDS from Mary's Garden Pack, Companion Seeds: Borage, Nasturtium, Marigold Basil Choose from 50 or 100 coconut coir pellets 10 plant markers 2 ounces Organic Neem Oil 1 pound Mary's Organic Plant Food 1 pound Azomite
2 GARDEN TOOLS: CULTIVATOR IS 9" LONG --- SPADE IS 10" LONG WOOD HANDLES & A HANDY LEATHER LOOP TO HANG ON PEGBOARD HOOK
Looking to start a garden but not sure where to start? Looking for a fun gift idea for just about any age? You choose the seed combination using the drop down menu. Each stater kit includes: -SEEDS -12 Coconut Coir Pellets -Plant Markers -Basic planting instructions with detailed instructions available on our GROWING TIPS & VIDEOS page SEEDS OPTIONS: 1. Mortgage Lifter Tomato, Large Leaf Basil & Black Beauty Zucchini 2. Cal Wonder Bell Pepper, Large Leaf Basil & Tom Thumb Lettuce 3. Black Beauty Eggplant, Pink Icicle Tomato & Large Leaf Basil
Make wonderful homemade Pizza fresh from the garden! One packet of each. Includes: -Thessaloniki Tomato -Cal Wonder Bell Pepper -Oregano -Basil Option 1: Seeds only Option 2: Starter Kit Starter kit Includes 16 starter pellets, plant markers and 2 garden tools CULTIVATOR IS 9" LONG --- SPADE IS 10" LONG WOOD HANDLES & A HANDY LEATHER LOOP TO HANG ON PEGBOARD HOOK
Not new but should be mentioned are the original starter kits
 Don't miss out on these Yellow Pear Tomatoes


 "IN THE KITCHEN" HERB GARDEN COMBO